Working on and off VPN simultaneously (Linux)
Sometimes, you might want to work on and off VPN simultaneously. For example, you might want to be able to visit websites restricted for your country by using a VPN. But at the same time, you might want to stay off-VPN for your regular browsing needs. This could be because you don't want to slow down your regular browsing or you want to keep your default location for this traffic. This article will explain how you can maintain the desired applications on and off VPN seamlessly.
While this article can be used for any application, we will take browsers as examples as browsing is the most common network activity.
Desired Setup
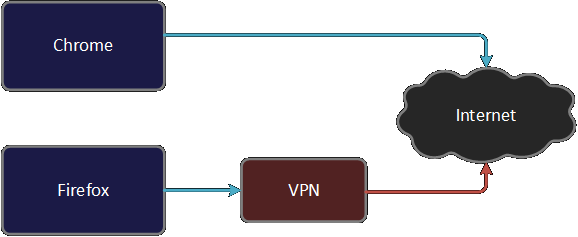
Network Setup
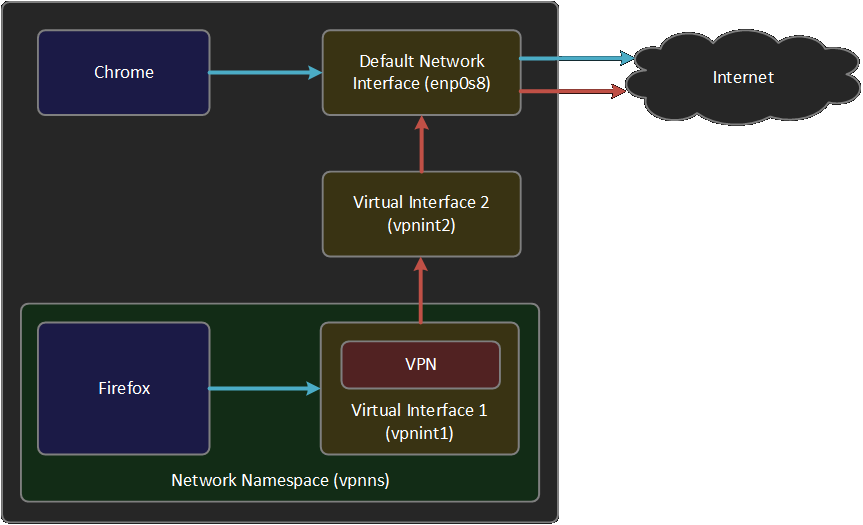
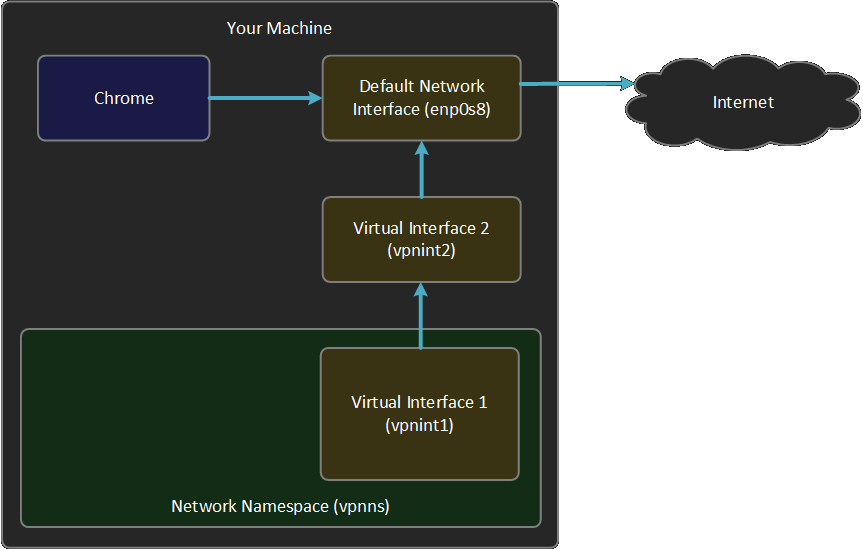
To achieve our desired setup, we will create a network namespace. We will enable VPN in the newly created network namespace and start Firefox in this namespace. We will continue to run chrome in our default namespace. Hence you will be able to browse the internet with VPN from Firefox and without VPN from chrome simultaneously.
Before we begin, let's look at our current network setup.
ubuntu@pc:~$ip a 1:lo: <LOOPBACK,UP,LOWER_UP> mtu 65536 qdisc noqueue state UNKNOWN group default qlen 1000 link/loopback 00:00:00:00:00:00 brd 00:00:00:00:00:00 inet 127.0.0.1/8 scope host lo valid_lft forever preferred_lft forever inet6 ::1/128 scope host valid_lft forever preferred_lft forever 2:enp0s8: <BROADCAST,MULTICAST,UP,LOWER_UP> mtu 1500 qdisc fq_codel state UP group default qlen 1000 link/ether 08:00:27:9c:0a:d1 brd ff:ff:ff:ff:ff:ff inet10.0.3.15/24 brd 10.0.3.255 scope global dynamic noprefixroute enp0s8 valid_lft 85599sec preferred_lft 85599sec inet6 fe80::8680:905:acf0:1ef8/64 scope link noprefixroute valid_lft forever preferred_lft forever ubuntu@pc:~$
Note that our default interface is
Creating new namespace
Let's create our namespace with the name
ubuntu@pc:~$sudo ip netns add vpnns ubuntu@pc:~$sudo ip netns list vpnns ubuntu@pc:~$
You can now execute commands (run processes) in the newly created namespace using
the syntax
Let's check the interface configurations and connectivity from the
ubuntu@pc:~$sudo ip netns exec vpnns ip a 1: lo: <LOOPBACK> mtu 65536 qdisc noop state DOWN group default qlen 1000 link/loopback 00:00:00:00:00:00 brd 00:00:00:00:00:00 ubuntu@pc:~$sudo ip netns exec vpnns ping 127.0.0.1 ping: connect: Network is unreachable
Note that we cannot even ping
ubuntu@pc:~$sudo ip netns exec vpnns ip link set lo up ubuntu@pc:~$sudo ip netns exec vpnns ping 127.0.0.1 PING 127.0.0.1 (127.0.0.1) 56(84) bytes of data.64 bytes from 127.0.0.1: icmp_seq=1 ttl=64 time=0.013 ms 64 bytes from 127.0.0.1: icmp_seq=2 ttl=64 time=0.022 ms ^C --- 127.0.0.1 ping statistics --- 2 packets transmitted, 2 received, 0% packet loss, time 1010ms rtt min/avg/max/mdev = 0.013/0.017/0.022/0.004 ms ubuntu@pc:~$
Now, let's create two
Virtual Ethernet Devices (
Well, think again! What is a network interface or a network card used for? It's used to connect your computer with another computer, router etc. To be specific, they are used to connect to another network interface. Hence one
ubuntu@pc:~$sudo ip link add vpnint1 type veth peer name vpnint2 ubuntu@pc:~$ip a 1:lo : <LOOPBACK,UP,LOWER_UP> mtu 65536 qdisc noqueue state UNKNOWN group default qlen 1000 link/loopback 00:00:00:00:00:00 brd 00:00:00:00:00:00 inet 127.0.0.1/8 scope host lo valid_lft forever preferred_lft forever inet6 ::1/128 scope host valid_lft forever preferred_lft forever 2:enp0s8 : <BROADCAST,MULTICAST,UP,LOWER_UP> mtu 1500 qdisc fq_codel state UP group default qlen 1000 link/ether 08:00:27:9c:0a:d1 brd ff:ff:ff:ff:ff:ff inet10.0.3.15/24 brd 10.0.3.255 scope global dynamic noprefixroute enp0s8 valid_lft 82388sec preferred_lft 82388sec inet6 fe80::8680:905:acf0:1ef8/64 scope link noprefixroute valid_lft forever preferred_lft forever 3:vpnint2@vpnint1 : <BROADCAST,MULTICAST,M-DOWN> mtu 1500 qdisc noop state DOWN group default qlen 1000 link/ether 8a:33:f5:46:e0:b9 brd ff:ff:ff:ff:ff:ff 4:vpnint1@vpnint2 : <BROADCAST,MULTICAST,M-DOWN> mtu 1500 qdisc noop state DOWN group default qlen 1000 link/ether 32:82:0d:6a:8c:24 brd ff:ff:ff:ff:ff:ff ubuntu@pc:~$
With
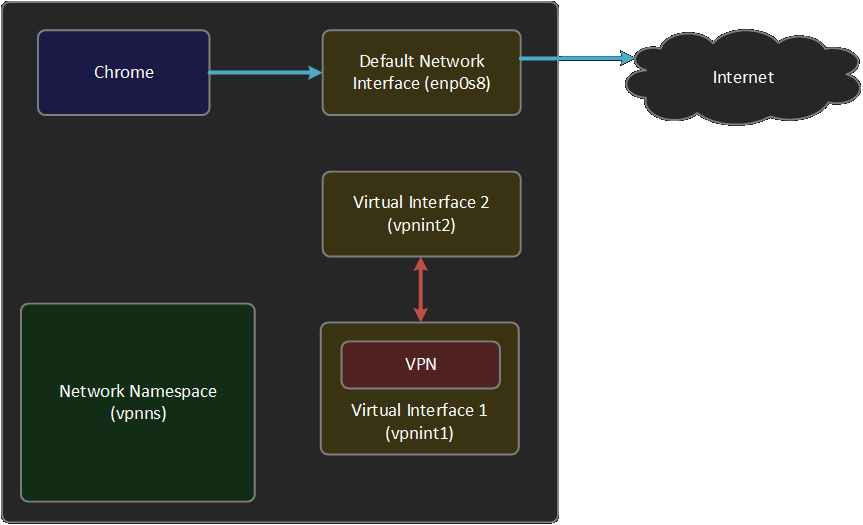
Now let's move the virtual interface
ubuntu@pc:~$sudo ip link set vpnint1 netns vpnns ubuntu@pc:~$sudo ip netns exec vpnns ip a 1: lo: <LOOPBACK,UP,LOWER_UP> mtu 65536 qdisc noqueue state UNKNOWN group default qlen 1000 link/loopback 00:00:00:00:00:00 brd 00:00:00:00:00:00 inet 127.0.0.1/8 scope host lo valid_lft forever preferred_lft forever inet6 ::1/128 scope host valid_lft forever preferred_lft forever 4:vpnint1@if3 : <BROADCAST,MULTICAST> mtu 1500 qdisc noop state DOWN group default qlen 1000 link/ether 32:82:0d:6a:8c:24 brd ff:ff:ff:ff:ff:ff link-netnsid 0 ubuntu@pc:~$ip a 1: lo: <LOOPBACK,UP,LOWER_UP> mtu 65536 qdisc noqueue state UNKNOWN group default qlen 1000 link/loopback 00:00:00:00:00:00 brd 00:00:00:00:00:00 inet 127.0.0.1/8 scope host lo valid_lft forever preferred_lft forever inet6 ::1/128 scope host valid_lft forever preferred_lft forever 2: enp0s8: <BROADCAST,MULTICAST,UP,LOWER_UP> mtu 1500 qdisc fq_codel state UP group default qlen 1000 link/ether 08:00:27:9c:0a:d1 brd ff:ff:ff:ff:ff:ff inet 10.0.3.15/24 brd 10.0.3.255 scope global dynamic noprefixroute enp0s8 valid_lft 81565sec preferred_lft 81565sec inet6 fe80::8680:905:acf0:1ef8/64 scope link noprefixroute valid_lft forever preferred_lft forever 3:vpnint2@if4 : <BROADCAST,MULTICAST> mtu 1500 qdisc noop state DOWN group default qlen 1000 link/ether 8a:33:f5:46:e0:b9 brd ff:ff:ff:ff:ff:ff link-netns vpnns ubuntu@pc:~$
Now let's assign IPs to the interfaces and bring them up. In the following example,
I have used the subnet 10.100.100.0/24. However, you may use the subnet of your
choice. But make sure that the IPs of both
ubuntu@pc:~$sudo ip netns exec vpnns ip addr add 10.100.100.1/24 dev vpnint1 ubuntu@pc:~$sudo ip netns exec vpnns ip link set vpnint1 up ubuntu@pc:~$sudo ip addr add 10.100.100.2/24 dev vpnint2 ubuntu@pc:~$sudo ip link set vpnint2 up
Now that our interfaces are up, let's do some quick verification. Let's start with
ubuntu@pc:~$sudo ip netns exec vpnns ip a 1: lo: <LOOPBACK,UP,LOWER_UP> mtu 65536 qdisc noqueue state UNKNOWN group default qlen 1000 link/loopback 00:00:00:00:00:00 brd 00:00:00:00:00:00 inet 127.0.0.1/8 scope host lo valid_lft forever preferred_lft forever inet6 ::1/128 scope host valid_lft forever preferred_lft forever 4:vpnint1@if3 : <BROADCAST,MULTICAST,UP,LOWER_UP> mtu 1500 qdisc noqueue state UP group default qlen 1000 link/ether 32:82:0d:6a:8c:24 brd ff:ff:ff:ff:ff:ff link-netnsid 0 inet10.100.100.1/24 scope global vpnint1 valid_lft forever preferred_lft forever inet6 fe80::3082:dff:fe6a:8c24/64 scope link valid_lft forever preferred_lft forever ubuntu@pc:~$ip a 1: lo: <LOOPBACK,UP,LOWER_UP> mtu 65536 qdisc noqueue state UNKNOWN group default qlen 1000 link/loopback 00:00:00:00:00:00 brd 00:00:00:00:00:00 inet 127.0.0.1/8 scope host lo valid_lft forever preferred_lft forever inet6 ::1/128 scope host valid_lft forever preferred_lft forever 2: enp0s8: <BROADCAST,MULTICAST,UP,LOWER_UP> mtu 1500 qdisc fq_codel state UP group default qlen 1000 link/ether 08:00:27:9c:0a:d1 brd ff:ff:ff:ff:ff:ff inet 10.0.3.15/24 brd 10.0.3.255 scope global dynamic noprefixroute enp0s8 valid_lft 81047sec preferred_lft 81047sec inet6 fe80::8680:905:acf0:1ef8/64 scope link noprefixroute valid_lft forever preferred_lft forever 3:vpnint2@if4 : <BROADCAST,MULTICAST,UP,LOWER_UP> mtu 1500 qdisc noqueue state UP group default qlen 1000 link/ether 8a:33:f5:46:e0:b9 brd ff:ff:ff:ff:ff:ff link-netns vpnns inet10.100.100.2/24 scope global vpnint2 valid_lft forever preferred_lft forever inet6 fe80::8833:f5ff:fe46:e0b9/64 scope link valid_lft forever preferred_lft forever ubuntu@pc:~$
Let's make sure that we can ping both interfaces from each other.
ubuntu@pc:~$sudo ip netns exec vpnns ping 10.100.100.2 -c 2 PING 10.100.100.2 (10.100.100.2) 56(84) bytes of data.64 bytes from 10.100.100.2: icmp_seq=1 ttl=64 time=0.016 ms 64 bytes from 10.100.100.2: icmp_seq=2 ttl=64 time=0.027 ms --- 10.100.100.2 ping statistics --- 2 packets transmitted, 2 received, 0% packet loss, time 1027ms rtt min/avg/max/mdev = 0.016/0.021/0.027/0.005 ms ubuntu@pc:~$ping 10.100.100.1 -c 2 PING 10.100.100.1 (10.100.100.1) 56(84) bytes of data.64 bytes from 10.100.100.1: icmp_seq=1 ttl=64 time=0.018 ms 64 bytes from 10.100.100.1: icmp_seq=2 ttl=64 time=0.027 ms --- 10.100.100.1 ping statistics --- 2 packets transmitted, 2 received, 0% packet loss, time 1019ms rtt min/avg/max/mdev = 0.018/0.022/0.027/0.004 ms ubuntu@pc:~$
The ability to ping each other makes sure that the interfaces are connected.
But let's also make sure that we can also send and receive TCP packets.
To validate this, we will start
| Terminal 1 | Terminal 2 |
|---|---|
ubuntu@pc:~$ sudo ip netns exec vpnns nc -nvlp 4444 Listening on 0.0.0.0 4444 Connection received on 10.100.100.2 46036 hello from vpnint2 |
ubuntu@pc:~$ nc -nv 10.100.100.1 4444 Connection to 10.100.100.1 4444 port [tcp/*] succeeded! hello from vpnint2 ^C |
ubuntu@pc:~$ nc -nvlp 4444 Listening on 0.0.0.0 4444 Connection received on 10.100.100.1 55086 hello from vpnint1 |
ubuntu@pc:~$ sudo ip netns exec vpnns nc -nv 10.100.100.2 4444 Connection to 10.100.100.2 4444 port [tcp/*] succeeded! hello from vpnint1 ^C |
Configuring NAT and Packet forwarding
Now we can give internet connectivity to
ubuntu@pc:~$sudo sh -c "echo 1 > /proc/sys/net/ipv4/ip_forward" ubuntu@pc:~$sudo iptables -A FORWARD -i vpnint2 -o enp0s8 -j ACCEPT ubuntu@pc:~$sudo iptables -A FORWARD -i enp0s8 -o vpnint2 -j ACCEPT ubuntu@pc:~$
Let's validate our steps.
ubuntu@pc:~$cat /proc/sys/net/ipv4/ip_forward 1 ubuntu@pc:~$sudo iptables -L -v Chain INPUT (policy ACCEPT 372 packets, 25212 bytes) pkts bytes target prot opt in out source destination Chain FORWARD (policy ACCEPT 0 packets, 0 bytes) pkts bytes target prot opt in out source destination0 0 ACCEPT all -- vpnint2 enp0s8 anywhere anywhere 0 0 ACCEPT all -- enp0s8 vpnint2 anywhere anywhere Chain OUTPUT (policy ACCEPT 372 packets, 25212 bytes) pkts bytes target prot opt in out source destination ubuntu@pc:~$
Now let's setup our NAT.
ubuntu@pc:~$sudo iptables -t nat -A POSTROUTING -s 10.100.100.2/24 -o enp0s8 -j MASQUERADE ubuntu@pc:~$
Explaining how
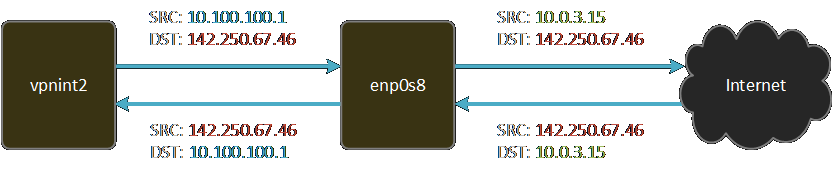
The following screenshot shows the packets as they pass through

Finally, let's set the default gateway for
ubuntu@pc:~$sudo ip netns exec vpnns ip route add default via 10.100.100.2 ubuntu@pc:~$sudo ip netns exec vpnns ip route list default via 10.100.100.2 dev vpnint1 10.100.100.0/24 dev vpnint1 proto kernel scope link src 10.100.100.1 ubuntu@pc:~$
Now let's try to ping Google from
ubuntu@pc:~$sudo ip netns exec vpnns ping google.com ping: google.com: Temporary failure in name resolution
Oh… that failed! But is it just a name resolution problem?
Can we ping 8.8.8.8 from
Configuring DNS
ubuntu@pc:~$sudo ip netns exec vpnns ping 8.8.8.8 -c 2 PING 8.8.8.8 (8.8.8.8) 56(84) bytes of data.64 bytes from 8.8.8.8: icmp_seq=1 ttl=61 time=19.5 ms 64 bytes from 8.8.8.8: icmp_seq=2 ttl=61 time=19.6 ms --- 8.8.8.8 ping statistics --- 2 packets transmitted, 2 received, 0% packet loss, time 1002ms rtt min/avg/max/mdev = 19.549/19.561/19.573/0.012 ms ubuntu@pc:~$
That worked! We cannot ping google.com, but we can ping 8.8.8.8.
Have you guessed the problem already? Yes, we have a DNS
resolution problem. But why? Let's check our
ubuntu@pc:~$cat /etc/resolv.conf # This file is managed by man:systemd-resolved(8). Do not edit. --- omitted for brevity ---- # operation for /etc/resolv.conf.nameserver 127.0.0.53 options edns0
Here is the problem: our machine is using 127.0.0.53 as the DNS server.
This is nothing but the "systemd-resolved" daemon. Ideally, we want to keep using
this service to keep up to date with the changes in the public DNS server addresses.
However, this service is now listening to the loopback interface (
Note that the
ubuntu@pc:~$sudo mkdir -p /etc/netns/vpnns ubuntu@pc:~$sudo sh -c "echo 'nameserver 8.8.8.8' >> /etc/netns/vpnns/resolv.conf" ubuntu@pc:~$sudo sh -c "echo 'nameserver 8.8.4.4' >> /etc/netns/vpnns/resolv.conf"
Now let's try to ping Google from
ubuntu@pc:~$sudo ip netns exec vpnns ping www.google.com -c 2 PING www.google.com (142.250.71.36) 56(84) bytes of data.64 bytes from maa03s35-in-f4.1e100.net (142.250.71.36): icmp_seq=1 ttl=61 time=16.0 ms 64 bytes from maa03s35-in-f4.1e100.net (142.250.71.36): icmp_seq=2 ttl=61 time=16.8 ms --- www.google.com ping statistics --- 2 packets transmitted, 2 received, 0% packet loss, time 1001ms rtt min/avg/max/mdev = 16.026/16.436/16.847/0.410 ms ubuntu@pc:~$sudo ip netns exec vpnns curl www.google.com <!doctype html%gt;<html itemscope="" itemtype="http://schema.org/WebPage" lang="en-IN"%gt;<head%gt;<meta content="text/html; charset=UTF-8" h--- omitted for brevity ----
Success! We can ping as well as curl google.com. That means, both ICMP and TCP packets are getting router correctly. So here is our progress:
The final step
Now we just need to start the VPN and Firefox in
ubuntu@pc:~$sudo ip netns exec vpnns openvpn --config your-config-file.conf \ --auth-user-pass your-username-passwrd-file.txt ---- redacted ---- xx xx xx 04:49:01 xxxxInitialization Sequence Completed
Let's verify that the VPN interface
ubuntu@pc:~$sudo ip netns exec vpnns ip a 1: lo: <LOOPBACK,UP,LOWER_UP> mtu 65536 qdisc noqueue state UNKNOWN group default qlen 1000 link/loopback 00:00:00:00:00:00 brd 00:00:00:00:00:00 inet 127.0.0.1/8 scope host lo valid_lft forever preferred_lft forever inet6 ::1/128 scope host valid_lft forever preferred_lft forever 2:tun0 : <POINTOPOINT,MULTICAST,NOARP,UP,LOWER_UP> mtu 1500 qdisc fq_codel state UNKNOWN group default qlen 100 link/none inet 10.35.15.112/24 brd 10.35.15.255 scope global tun0 valid_lft forever preferred_lft forever inet6 fe80::8da0:9540:44b7:650c/64 scope link stable-privacy valid_lft forever preferred_lft forever 4: vpnint1@if3: <BROADCAST,MULTICAST,UP,LOWER_UP> mtu 1500 qdisc noqueue state UP group default qlen 1000 link/ether 32:82:0d:6a:8c:24 brd ff:ff:ff:ff:ff:ff link-netnsid 0 inet 10.100.100.1/24 scope global vpnint1 valid_lft forever preferred_lft forever inet6 fe80::3082:dff:fe6a:8c24/64 scope link valid_lft forever preferred_lft forever ubuntu@pc:~$
All good, let's start Firefox from a different terminal. But before we do that,
just one more thing: Till now, we have been running commands within
ubuntu@pc:~$sudo ip netns exec vpnns whoami root
Running browsers as root user is a bad idea. Hence, let's start a
bash session within
ubuntu@pc:~$sudo ip netns exec vpnns bash root@pc:/home/ubuntu#su ubuntu ubuntu@pc:~$firefox ubuntu@pc:~$
Now you can start Chrome as usual (without using
The end