Safe Development with LXC
As a developer, how many times have you run unknown scripts (from the internet) in your system? Many times, the developers are limited by time or motivation to read through the scripts they find online. And sometimes, it's not even practical to go through every package and script that we run or install. What if one of those scripts you run contains malware? This is especially alarming since most of us use the same laptop in our developer and personal lives.
Two popular choices that can solve this issue are virtual machines and Docker containers. You can develop in a virtual machine or a docker container to isolate your developer life from your personal life. But virtual machines are resource-heavy and Docker containers might not be suitable for a long-term development plan. What you need is a container that is easy to manage and lightweight. And that's why you need LXC!
So, what is LXC? Well, another article on LXC/LXD will be redundant. So, instead of reinventing the wheel, I will point you to the right resources to get you started.
LXC containers are often considered as something in the middle between a chroot and a full fledged virtual machine. The goal of LXC is to create an environment as close as possible to a standard Linux installation but without the need for a separate kernel.
~ Linux Containers Docs
LXD is a next generation system container and virtual machine manager. It offers a unified user experience around full Linux systems running inside containers or virtual machines.
~ Linux Containers Docs
To summarize, imagine LXD to be something like your VM Manager, which helps you create and manage containers by using LXC under the hood. Since the underlying runtime is LXC, you will see most people say LXC instead of LXD.
To get comfortable with LXC, I recommend you start at this video by LearnLinuxTV.
General Commands for Command-line Usage
Here are a few useful commands for your reference.
# search available images on 'ubuntu' repo lxc image list ubuntu: 24.04 architecture=$(uname -m)# search available images on the default 'images' repo lxc image list images: 24.04 architecture=$(uname -m)# launch a container by name 'dev' using the image 'ubuntu 24.04' from 'ubuntu' repo lxc launch ubuntu:24.04 dev# launch a container by name 'kali' using the image 'kali' from 'images' repo lxc launch images:kali kali# start a container lxc start {container-name}# stop a container lxc stop {container-name}# execute commands in a container lxc exec {container-name} -- {command}# get shell in a container lxc exec {container-name} -- bash
UID and GID Mapping
To use the container seamlessly from the host, you will have to allow the LXC to impersonate the host user.
For example, let's say you shared a folder between a LXC container and the host. Now, when the container creates
a file on the shared folder, the file creation is actually done by the LXC service that is running as
Allowing LXC to impersonate regular user on the host is not only useful to work with shared folders, but it will also be required for many other scenarios such as running GUI apps on the container.
The following command adds a line
# run on the host
echo "root:$UID:1" | sudo tee -a /etc/subuid /etc/subgid
Shared Folders
You can share folders from your host system to your container so that you can access the files from both the systems. This will be helpful in various scenarios. For example, let's say you want to push your code to GitHub. But you don't want to expose your GitHub (SSH) keys to the container since the container is considered unsafe. In that case, you mount a folder to make it accessible to both the host as well as the container. Now you develop (write and run) the code in this folder from your container. And you push this code to GitHub from your host system.
Use the following command to share host directories with a container.
(host)$ lxc config device add {container-name} {share-name} disk source={source-path-on-host} path={destination-path-on-container}# Example: (host)$ lxc config device add dev shared-folder-1 disk source=/home/$USER/share path=/home/ubuntu/share
GUI and Audio Applications in LXC
'Everything is a file in Linux'. We can share a lot of things between the host and the container by sharing files and sockets. We will share sockets for GUI and Audio from the host to the container to help run GUI and Audio apps on the container.
To do so, we first create a profile. A LXC profile is a set of configurations. We can attack the profile to a container to apply these configurations on the container.
lxc profile create gui-audio# 'gui-audio' is the name of the profile
The contents of the profile should be as follows:
config:# set $DISPLAY environment variable environment.DISPLAY: :0# map UID 1000 in container to UID 1000 on host raw.idmap: both 1000 1000 user.user-data: | runcmd:# do not allow pulse audio to use shared memory - update /etc/pulse/client.conf - 'sed -i "s/; enable-shm = yes/enable-shm = no/g" /etc/pulse/client.conf'# update $PULSE_SERVER env variable to point to unix socket # this unix socket will be the host's pulse audio socket shared to guest - 'echo export PULSE_SERVER=unix:/tmp/.pulse-native | tee --append /home/ubuntu/.profile' packages: - x11-apps - mesa-utils - pulseaudio description: GUI and Audio profile for LXD devices:# Share Pulse Audio Socket with the container PulseAudioSocket: path: /tmp/.pulse-native source: /run/user/1000/pulse/native type: disk# Share GUI socket with the container (This could be X1 in some cases) X0: path: /tmp/.X11-unix/X0 source: /tmp/.X11-unix/X0 type: disk# share GPU with the container # Refer to https://documentation.ubuntu.com/lxd/en/latest/reference/devices_gpu/#device-gpu-physical-device-conf:mode for more settings GPUShare: type: gpu name: gui-audio-profile used_by:
Some explanation of what the profile does is commented on the profile itself. In short, we share the sockets
Note that 'UID and GID Mapping' is a pre-requisite to all this.
You can update the profile using either of the following commands:
# Download the profile from my github and update: curl https://raw.githubusercontent.com/pwnlogs/tools/main/setup/lxc-gui-audio-profile.yaml | lxc profile edit gui-audio# Manually update the profile: lxc profile edit gui-audio
Now your profile is ready. You can add this profile to the container to enabled GUI and Audio for the container:
lxc profile add {container-name}> gui-audio
Note: I have noticed that the
lxc exec {container-name} -- apt install -y mesa-utils
lxc exec {container-name} -- apt install -y pulseaudio-utils
With the above setup ready, you can start the GUI applications from command line:
lxc exec {container-name} -- sudo --user {user-name} --login glxgears
# glxgears is the application
Application Launch Icons for LXC
Now you can start GUI applications within the container from a command line. However, we can do better. Let's create launch icons for applications within the container so that they can be launched just like an application on the host system. For demo purposes, we will create a launcher for file explorer. You can use the same technique to create launchers for other programs as well.Creating a Launcher for File Explorer
1) In your container:
First, make sure nautilus (GNOME file manager) is installed by running
(container)$ sudo apt-get install -y nautilus
2) In your host system
- Go to
~/.local/share/applications in your host system. - Create a file with
.desktop extension. -
The contents of this file should be as follows:
#!/usr/bin/env xdg-open [Desktop Entry] Version=1.0 Terminal=false Type=Application Name=LXC Files Exec=lxc exec {container-name} -- sudo --user {user-name} --login nautilus Icon={icon's-absolute-path} Categories=Application; - Replace
{container-name} ,{user-name} and{icon's-absolute-path} appropriately.
Notes:
- Both the
{container-name} and{user-name} will beubuntu if you followed the LearnLinuxTV tutorial above. - The icon for the application should be available in the host system.
- I have created a few icons combining various application icons with LXC logo. This helps avoid confusion when the application is installed in the host as well as the container. You can find them below.


- Both the
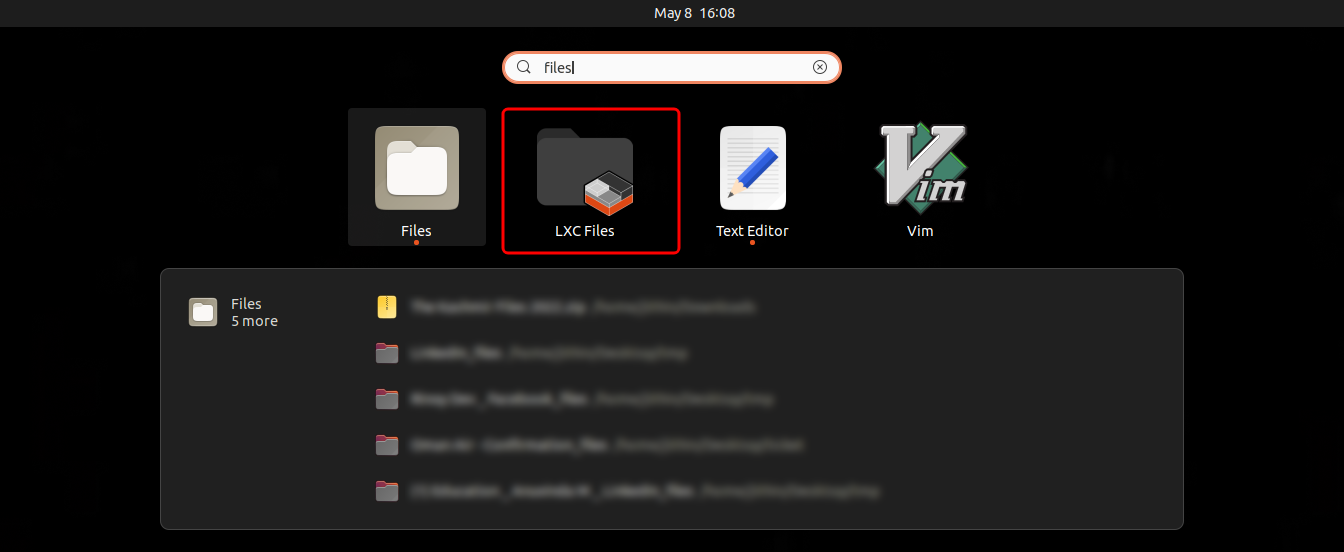
- Go to applications and search for
lxc . You will find the launch icon appearing.
Note: Launch configurations might take a few minutes to sync. Try restarting your system if it is taking a long time.
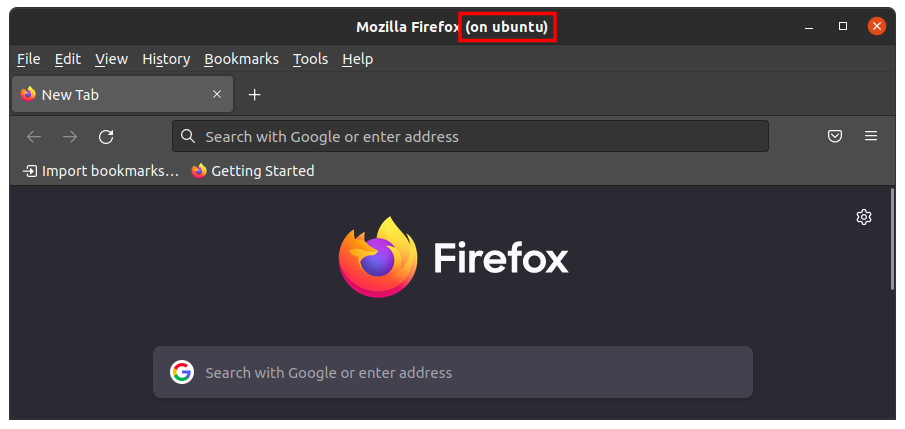
 When you launch a GUI application within the container, the title bar will indicate the container in which the application is running.
The following screenshot shows Firefox running in a container named "ubuntu".
When you launch a GUI application within the container, the title bar will indicate the container in which the application is running.
The following screenshot shows Firefox running in a container named "ubuntu".
Now you can launch applications within the container just like the native GUI applications. Note that now the container runtime has no access to any of the files in your host system. However, sometimes you might want to share a few files between the host and the container. The following section explains how you can share a folder between the container and the host.
Privileged Containers
You can mark a container as 'privileged' to add additional capabilities to it. LXC has nicely summarised this topic here. The following command marks a container as privileged.
# Mark the container as privileged
lxc config set {container-name} security.privileged true
Emulators within LXC
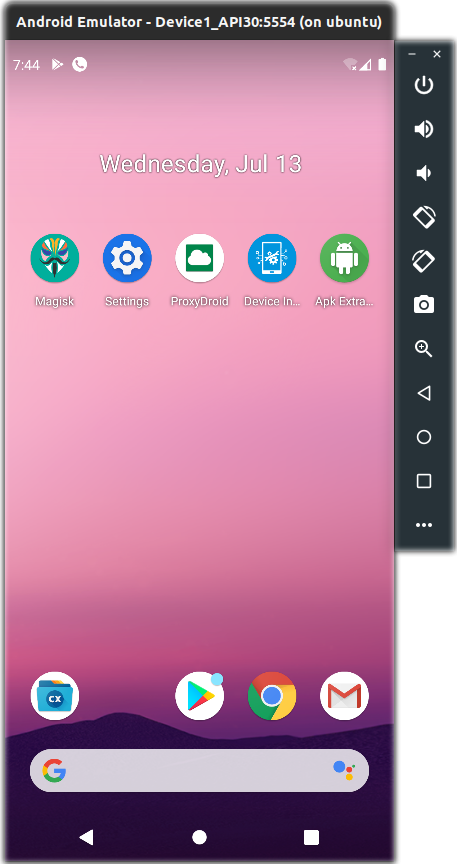
If you are an android developer, you might want to run AVD emulators inside your container.
AVD emulators are based on QEMU. You can use the following tutorial to set up QEMU for LXC.
Essential requirements in short
-
Allow container nesting: Add the following to the container configuration (
lxc config edit {container-name} ):config: security.nesting: "true" - Expose
/dev/kvm of the host to the container:devices: kvm: path: /dev/kvm type: unix-char -
Install
qemu-kvm on the container:(container)$ sudo apt install qemu-kvm -
Add your user to
kvm group:(container)$ sudo adduser $USER kvm
Once your setup is complete, you can use the command
Install Android Studio and AVD in your container and you can start your Android development within your container.
Closing Remarks
You can do almost everything you need within the container. Some requirements might want you to expose a few necessary unix sockets, ports, and folders to the container. However, a limitation of the container is when you need to modify the kernel or load kernel modules. Such developments will still require a VM as the container shares the kernel of the host system. Your containers cannot modify your kernel.The end